|
Electronic Components Datasheet Search |
|
|
Electronic Components Datasheet Search |
|
962-7DA1-135 Datasheet(PDF) 9 Page - Magnetrol International, Inc. |
|
|
|||||||||||||||||||||||||||||
962-7DA1-135 Datasheet(HTML) 9 Page - Magnetrol International, Inc. |
|
|
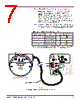
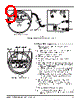
9 / 36 page  9 51-646 Echotel® Model 961 & 962 Ultrasonic Level Switches 2.4.3 Model 962 Line-powered Wiring Power and relay wiring connections are suitable for 12–24 AWG wire. Caution: OBSERVE ALL APPLICABLE ELECTRICAL CODES AND PROPER WIRING PROCEDURES. 1. Make sure the power source is turned off. 2. Unscrew and remove housing cover. 3. Pull power supply and relay wires through the conduit connection. 4. Refer to Figure 10. Connect power leads to proper terminals. Model 962 is available for AC power (102 to 265 VAC) or for DC power (18–32 VDC) a. AC Power – Connect “hot” wire to terminal marked L1 and the “neutral” wire to the terminal marked L2. The green head screw should be used for grounding. b. DC Power – Connect wires to terminals (+) and (-) on the terminal block. The green head screw should be used for grounding. 5. Connect desired relay wiring as shown in Figure 10. 6. Prevent moisture seepage into housing by installing an approved seal drain fitting in the conduit run leading to the unit. 7. Wiring is complete. Replace housing cover. Caution: In hazardous areas, do not power the unit until the conduit is sealed and enclosure cover is screwed down securely. TIME DELAY LEVEL TEST MALF TEST MALF RELAY FAULT MALF LOWER UPPER MODEL 962 NC C NO NC C NO NC C NO L2 L1 Malfunction SPDT Relay Input Power Ground Lower Gap SPDT Relay Upper Gap SPDT Relay Hi PC Lo LC LOWER UPPER Figure 10 Model 962 Line-Powered Wiring Ground Shield: 1, 3 Signal: 2, 4 FORCE CHANGE FORCE FAULT TB2 TB3 037-3316-xxx Cabling Figure 9 Model 961 Loop-Powered Remote Transducer Wiring Remote Transducer Housing Electronics Module |
|
Link URL |
| Does ALLDATASHEET help your business so far? [ DONATE ] |
About Alldatasheet | Advertisement | Contact us | Privacy Policy | Link to Datasheet | Link Exchange | Manufacturer List All Rights Reserved©Alldatasheet.com |
| Russian : Alldatasheetru.com | Korean : Alldatasheet.co.kr | Spanish : Alldatasheet.es | French : Alldatasheet.fr | Italian : Alldatasheetit.com Portuguese : Alldatasheetpt.com | Polish : Alldatasheet.pl | Vietnamese : Alldatasheet.vn Indian : Alldatasheet.in | Mexican : Alldatasheet.com.mx | British : Alldatasheet.co.uk | New Zealand : Alldatasheet.co.nz |
|
Family Site : ic2ic.com |
icmetro.com |
 Indian ▼
 English
 Chinese
 German
 Japanese
 Russian
 Korean
 Spanish
 French
 Italian
 Portuguese
 Polish
 Vietnamese
 Indian
 Mexican
 British
 New Zealand